最近在寫一個多模塊的SpringBoot項目,基於過程總了一些總結,故把SpringBoot多個模塊的項目創建記錄下來。
首先,先建立一個父工程:
(1)在IDEA工具欄選擇File->New->Project
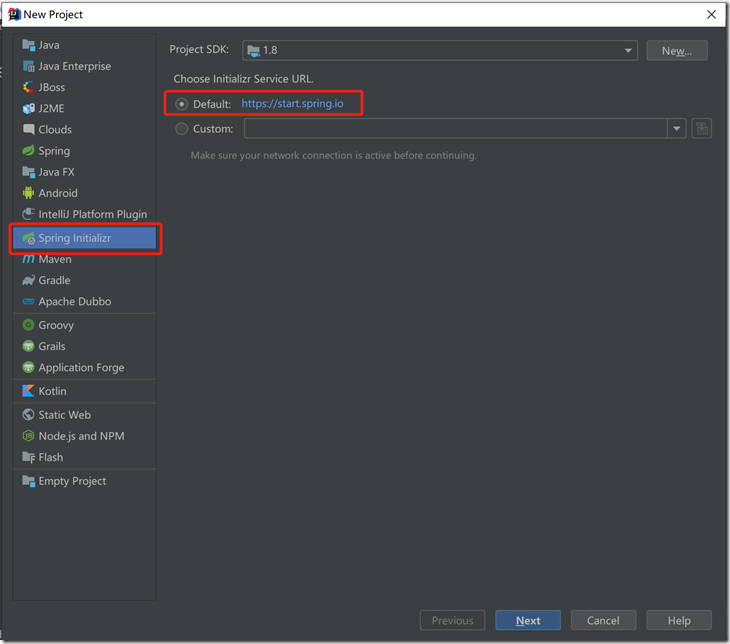
(2)選擇Spring Initializr,默認選擇Default,然後點擊Next:
(3)在輸入框填寫以下截圖內容,點擊Next
(4)直接點Next,無需選擇
(5)直接點擊Finish完成創建
(6)按照以上步驟,可以生成以下的項目目錄結構:
(7)這時把沒用的.mvn目錄,src目錄,mvnw還有mvnw.cmd都刪除,最終只保留.gitignore和pom.xml,若是web項目,可在該pom.xml里添加以下依賴:
1 <!--web特徵-->
2 <dependency>
3     <groupId>org.springframework.boot</groupId>
4     <artifactId>spring-boot-starter-web</artifactId>
5     <version>2.3.1.RELEASE</version>
6 </dependency>
最終得到以下的父結構目錄:
以上是創建父模塊,下面創建子模塊:
(1)在父模塊的根目錄fte上點右鍵,在彈出的框里選擇New->Module
(2)選擇Maven,點擊Next
(3)填寫以下內容,點擊Next
(4)填寫Module,點擊Finish
(5)同理添加fte-controller,fte-dao,fte-service,fte-web,最終得到以下的目錄結構:
(6)增加模塊之間的依賴:
controller層添加以下依賴:
 1 <dependencies>
 2     <dependency>
 3         <groupId>com.example</groupId>
 4         <artifactId>fte-common</artifactId>
 5         <version>0.0.1-SNAPSHOT</version>
 6     </dependency>
 7
 8     <dependency>
 9         <groupId>com.example</groupId>
10         <artifactId>fte-dao</artifactId>
11         <version>0.0.1-SNAPSHOT</version>
12     </dependency>
13
14     <dependency>
15         <groupId>com.example</groupId>
16         <artifactId>fte-service</artifactId>
17         <version>0.0.1-SNAPSHOT</version>
18     </dependency>
19 </dependencies>
service層添加以下依賴:
1 <dependencies>
2     <dependency>
3         <groupId>com.example</groupId>
4         <artifactId>fte-dao</artifactId>
5         <version>0.0.1-SNAPSHOT</version>
6     </dependency>
7 </dependencies>
(7)測試
在fte-controller創建com.zhu.fte.web包,增加以下兩個類:
fteWebApplication類:
 1 package com.zhu.fte.web;
 2
 3 import org.springframework.boot.SpringApplication;
 4 import org.springframework.boot.autoconfigure.SpringBootApplication;
 5
 6 @SpringBootApplication
 7 public class fteWebApplication {
 8     public static void main(String[] args) {
 9         SpringApplication.run(fteWebApplication.class,args);
10     }
11 }
DemoController類
 1 package java.com.zhu.fte.web;
 2
 3 import org.springframework.web.bind.annotation.GetMapping;
 4 import org.springframework.web.bind.annotation.RequestMapping;
 5 import org.springframework.web.bind.annotation.RestController;
 6
 7 @RestController
 8 @RequestMapping("demo")
 9 public class DemoController {
10
11     @GetMapping("test")
12     public String test(){
13         return "hello world";
14     }
15
16 }
運行發現出現錯誤:
出現錯誤:
[ERROR] Failed to execute goal org.apache.maven.plugins:maven-surefire-plugin:2.22.2:test (default-test) on project fte-common: Execution default-test of goal org.apache.maven.plugins:maven-surefire-plugin:2.22.2:test failed: Plugin org.apache.maven.plugins:maven-surefire-plugin:2.22.2 or one of its dependencies could not be resolved: Could not transfer artifact junit:junit:jar:4.12 from/to central (https://repo.maven.apache.org/maven2): Connect to repo.maven.apache.org:443 [repo.maven.apache.org/151.101.52.215] failed: Connection timed out: connect -> [Help 1]
把缺少的org.apache.maven.plugins手動放到父工程的pom.xml里
 1 <build>
 2    <plugins>
 3       <plugin>
 4          <groupId>org.apache.maven.plugins</groupId>
 5          <artifactId>maven-clean-plugin</artifactId>
 6          <version>2.5</version>
 7       </plugin>
 8       <plugin>
 9          <groupId>org.apache.maven.plugins</groupId>
10          <artifactId>maven-source-plugin</artifactId>
11          <version>2.2</version>
12       </plugin>
13       <plugin>
14          <groupId>org.apache.maven.plugins</groupId>
15          <artifactId>maven-compiler-plugin</artifactId>
16          <version>3.0</version>
17          <configuration>
18             <source>1.8</source>
19             <target>1.8</target>
20             <encoding>${file.encoding}</encoding>
21             <!--編譯的時候方法不改變方法參數名稱,用於支持使用反射獲取方法參數名稱-->
22             <compilerArgument>-parameters</compilerArgument>
23          </configuration>
24       </plugin>
25       <plugin>
26          <groupId>org.apache.maven.plugins</groupId>
27          <artifactId>maven-install-plugin</artifactId>
28          <version>2.4</version>
29       </plugin>
30       <plugin>
31          <groupId>org.apache.maven.plugins</groupId>
32          <artifactId>maven-jar-plugin</artifactId>
33          <version>2.4</version>
34          <configuration>
35             <archive>
36                <manifest>
37                   <addDefaultImplementationEntries>true
38                   </addDefaultImplementationEntries>
39                </manifest>
40             </archive>
41          </configuration>
42       </plugin>
43
44       <plugin>
45          <groupId>org.apache.maven.plugins</groupId>
46          <artifactId>maven-surefire-plugin</artifactId>
47          <version>2.13</version>
48          <configuration>
49             <argLine>-Xmx512M -Dfile.encoding=${file.encoding}</argLine>
50          </configuration>
51       </plugin>
52    </plugins>
53 </build>
運行fteWebApplication類里的main方法,默認端口為8080,訪問http://localhost:8080/demo/test,正常出現以下情況:
按照以上步驟,就可以初步建立SpringBoot多模塊的項目,下一章將基於這個基礎搭建Mybatis以及其逆向工程。
本站聲明:網站內容來源於博客園,如有侵權,請聯繫我們,我們將及時處理
【其他文章推薦】
※USB CONNECTOR掌控什麼技術要點? 帶您認識其相關發展及效能
※台北網頁設計公司這麼多該如何選擇?
※智慧手機時代的來臨,RWD網頁設計為架站首選
※評比南投搬家公司費用收費行情懶人包大公開
※幫你省時又省力,新北清潔一流服務好口碑
※回頭車貨運收費標準